

A mirror finish on resin cars is not created by one magic polish or one heavy coat of clear. It comes from a controlled sequence: clean resin, smooth primer, even color, enough clear coat, careful wet sanding, gradual polishing, and patient inspection under strong light.
Resin bodies can look rougher than injected plastic because they may arrive with mold release, tiny pinholes, faint casting texture, soft panel edges, or small waves in the surface. If these flaws are not corrected early, the final shine may still look glossy, but it will not look deep, flat, and reflective.
The goal is to make light bounce evenly from the surface. That means every layer must support the next one. A shiny clear coat over uneven primer will magnify imperfections, while aggressive sanding after clear coat can cut through edges, decals, or raised details.
This guide explains the process from preparation to final polishing, with practical checks for beginners who want a deep show-car shine on resin scale models without ruining the body shell.
Important safety note: sanding resin, spraying primer, applying clear coat, and using polishing compounds can create dust, vapors, and skin irritation risks. Work in strong ventilation, wear eye protection and gloves, follow the safety data sheet for each product, and use respiratory protection suitable for the material you are sanding or spraying.
How a Mirror Finish on Resin Cars Is Built Layer by Layer
A mirror finish starts long before polishing. Polishing only refines the surface that already exists. If the clear coat is thin, uneven, contaminated, or sitting over visible scratches, polishing will make the model shinier but not truly mirror-like.
Think of the finish as a stack of layers. The resin body provides the shape, the primer reveals and fills minor flaws, the color coat creates depth, the clear coat gives material to level, and the polishing stages remove fine sanding marks until reflections become sharp.
In practice, many failed mirror finishes happen because the builder rushes the early stages. A resin body that feels “good enough” after a quick wash may still have mold release, sanding dust in panel lines, or tiny pinholes around vents and wheel arches. These details become more obvious after clear coat.
| Layer or Stage | Main Purpose | What Can Go Wrong | Best Check Before Moving On |
|---|---|---|---|
| Resin body preparation | Remove release agents, flash, dust, and casting flaws. | Paint can fisheye, peel, or reveal hidden texture. | Inspect under angled light after washing and sanding. |
| Primer | Create a uniform base and reveal surface defects. | Pinholes, scratches, and waves remain visible. | Use a light guide coat or inspect with a bright lamp. |
| Color coat | Build even color without flooding details. | Orange peel, dust, uneven coverage, or thick edges. | Check that the color is smooth and fully cured. |
| Clear coat | Add depth and enough material for leveling. | Runs, dry spray, trapped solvent, or thin edges. | Look for even gloss before wet sanding. |
| Wet sanding | Level texture and dust nibs without cutting through. | Burn-through on edges, decals, or raised details. | Stop when the surface is evenly dull, not deeply scratched. |
| Compounding and polishing | Remove sanding haze and refine the shine. | Swirl marks, cloudy finish, or polished-through corners. | Inspect reflections from multiple angles. |
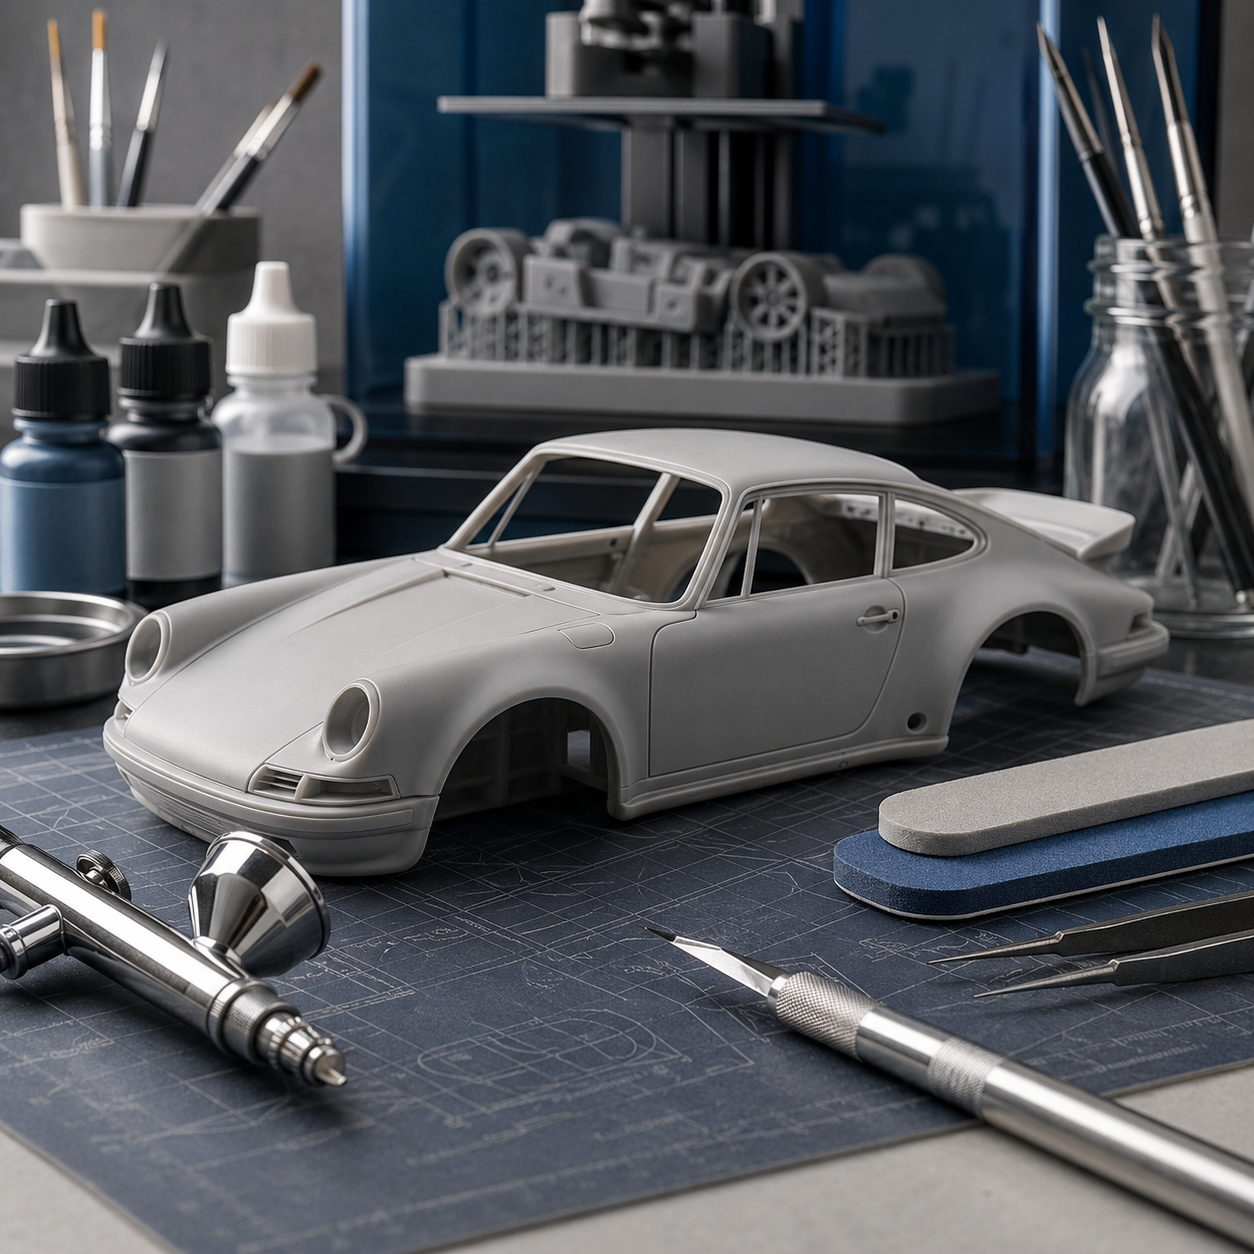
Tools and Materials You Need Before Starting
The best setup is not always the most expensive one. For resin model cars, control matters more than force. A soft sanding block, clean water, fine abrasive papers, microfiber cloths, cotton swabs, polishing compounds, and a good light source are enough for many hobby-level mirror finishes.
Choose materials that match the paint system you are using. Lacquer, enamel, acrylic lacquer, urethane, and hobby clear coats behave differently. Some cure quickly enough for polishing within days, while others remain soft longer. Always follow the product instructions instead of assuming every clear coat can be sanded the same way.
A common beginner mistake is using automotive-scale pressure on a small resin model. Resin bodies have thin pillars, delicate edges, and small raised details. Heavy sanding or high-speed rotary polishing can remove clear coat in seconds, especially around hood lines, fenders, roof edges, and door handles.
- Clean resin body with mild dish soap, warm water, and a soft brush before primer.
- Use fine sanding sticks or sanding sponges for mold lines and casting marks.
- Keep wet sanding papers in several grits, such as 2000, 3000, 5000, 7000, and 10000 when available.
- Use a soft sanding block on flat panels instead of sanding only with fingertips.
- Keep separate microfiber cloths for sanding residue, compound, polish, and final wipe-down.
- Use low-tack masking tape to protect sharp edges while practicing.
- Use polishing compounds in stages: cutting compound, fine polish, and finishing polish.
- Inspect the surface with a strong lamp before each new stage.
Water is also a tool. Wet sanding keeps dust down, helps the abrasive glide, and makes sanding marks more controlled. Add only a small drop of mild soap to the water if the paper grabs too much, but avoid soaking decals, panel lines, or areas where water can creep under masking.
Preparing the Resin Body for a Deep Gloss
Preparation is the stage that decides whether the mirror finish will look clean or “almost there.” Start by washing the body thoroughly. Resin castings often carry release agents that can interfere with primer and paint adhesion. A soft toothbrush helps clean panel lines, vents, grilles, and wheel arch edges.
After washing, let the body dry completely. Then remove flash, seam lines, and small casting bumps. Use light pressure and support thin areas from behind when possible. Resin can chip or flex in delicate sections, so do not treat it like a thick plastic kit body.
Before primer, inspect the body under angled light. Move the model slowly and look for waves, scratches, pinholes, rough roof sections, uneven fenders, or soft door gaps. The surface does not need to be glossy at this point, but it must be clean, smooth, and stable.
Pinholes deserve special attention. Tiny holes can hide until primer fills the surrounding surface and leaves small dark spots. Use a compatible putty, surfacer, or filler, then sand only after it cures. Rushing filler work can create sink marks that appear later under the clear coat.
- The body has been washed and fully dried.
- Panel lines are clean and not packed with sanding residue.
- Flash, mold lines, and casting nubs have been removed.
- Pinholes have been filled and sanded level.
- Thin edges have not been rounded off by heavy sanding.
- The surface feels smooth when gently wiped with a clean cloth.
- Primer choice is compatible with the resin and paint system.
- The workspace is free from dust before spraying begins.
Primer, Color Coat, and Clear Coat for a Mirror Finish
Primer is not just a base color. It is a diagnostic layer. After the first light coats of primer, flaws become easier to see. If the primer reveals scratches, pinholes, or waves, fix them before adding color. Do not bury obvious defects under more paint.
For color coat, thin and even layers usually work better than one wet coat. A heavy coat can hide panel lines, create solvent marks, or sag around lower body areas. Metallic and pearl colors need extra care because uneven spraying can change how the particles reflect light.
Clear coat is where depth is built, but more clear is not always better. You need enough clear to allow gentle leveling, but excessive buildup can soften details, create thick edges around decals, and increase the risk of trapped solvent. Let each product cure according to its own instructions before sanding or polishing.
If decals are involved, treat them as a risk zone. Decals need to be fully dry and sealed gently before heavier clear coats. Wet sanding directly over decal edges too early can expose, tear, or wrinkle them. Beginners should practice on a spare spoon or test body before attempting a decal-heavy resin car.
| Surface Condition | Likely Cause | What to Do | What to Avoid |
|---|---|---|---|
| Fisheyes or small craters | Oil, mold release, silicone, or surface contamination. | Stop, let it cure, sand smooth, clean carefully, and repaint. | Do not keep spraying wet coats over contamination. |
| Orange peel | Dry spray, thick paint, poor distance, or unsuitable thinning. | Let it cure, level carefully, then polish or re-clear if needed. | Do not polish deep texture without enough clear coat. |
| Dust nibs | Dust in the booth, dirty body, or static attraction. | Let the coat cure and remove nibs with fine wet sanding. | Do not pick fresh dust with fingers or tools. |
| Runs or sags | Clear applied too wet or too close. | Allow full curing, level the run with a small block, then polish. | Do not wipe a fresh run while it is soft. |
| Cloudy shine after polishing | Sanding marks not fully removed or clear still too soft. | Return to the correct abrasive or wait longer before polishing. | Do not keep applying wax to hide unresolved haze. |
Step-by-Step Wet Sanding and Polishing Process
Wet sanding should make the surface flatter, not thinner for no reason. The safest goal is to remove texture and dust nibs while preserving enough clear coat, especially on raised areas. If the clear coat is already smooth, you may not need aggressive sanding at all.
Start with the least aggressive grit that can solve the problem. For many resin model cars, jumping straight to coarse paper is unnecessary. A higher grit takes longer, but it reduces the chance of deep scratches and accidental burn-through.
-
Let the clear coat cure fully.
Do not sand a clear coat that still feels soft, smells strongly of solvent, or marks easily with light pressure. Soft clear can clog abrasive paper, smear, or polish to a cloudy shine. Follow the clear coat manufacturer’s curing guidance before leveling.
-
Wash the body gently before sanding.
Remove dust and loose particles so they do not become deep scratches under the sanding paper. Use clean water and a soft cloth, then dry the body with care around mirrors, vents, and panel lines.
-
Soak the sanding paper.
Let wet sanding sheets or pads absorb water before use. This helps the abrasive cut smoothly. Keep a clean water container nearby and rinse the paper often so old clear coat residue does not scratch the surface.
-
Level only the textured areas first.
Use a soft block on larger panels such as the hood, roof, and trunk. Sand in light, controlled strokes. Avoid pressing hard on curves, edges, pillars, fenders, and raised trim because those areas lose clear coat faster.
-
Watch for an evenly dull surface.
The surface should become uniformly matte where the orange peel has been leveled. Shiny low spots mean texture remains. Do not chase every low spot aggressively if the clear coat is thin; it may be safer to re-clear after light leveling.
-
Move through finer grits gradually.
Each grit should remove the marks from the previous grit. A practical sequence may move from 3000 to 5000, then 7000 or 10000, depending on the products you have. Skipping too far can leave scratches that compound will not remove easily.
-
Clean the model between grits.
Rinse the body, change or clean the cloth, and check panel lines. A single coarse particle left behind can create a scratch that appears only after polishing begins.
-
Use compound with light pressure.
Apply a small amount of cutting compound with a soft cloth, foam pad, or cotton applicator. Work in small areas and avoid heat buildup. On resin scale models, hand polishing is usually safer than a rotary tool for beginners.
-
Refine with finishing polish.
After the sanding haze is removed, switch to a finer polish. This step sharpens reflections and reduces swirl marks. Use a clean applicator so leftover cutting compound does not keep scratching the surface.
-
Inspect before waxing or sealing.
Check the model under bright light from several angles. Wax or sealant can add slickness, but it should not be used to hide sanding marks, soft clear, or residue trapped around details.
During polishing, less product often works better. Too much compound can build up around panel lines and badges, making cleanup risky. Use small amounts, clean often, and let the finish tell you when to move to the next stage.
Diagnosing Finish Problems Before You Ruin the Clear Coat
One of the hardest parts of achieving a mirror finish on resin cars is knowing when to continue and when to stop. A surface that is almost flat can tempt you to sand one more time, but that final pass can cut through clear on an edge.
A good diagnostic habit is to separate texture from scratches. Orange peel looks like uneven skin or small waves in reflected light. Sanding scratches look like straight or circular marks. Compound haze looks cloudy and dull. Each problem needs a different correction.
If the surface still has orange peel after fine sanding, you may need to step back to a slightly stronger abrasive, but only if the clear coat is thick enough. If the surface has deep scratches after polishing, you probably skipped grits or used contaminated paper. If the shine is cloudy everywhere, the clear may not be cured or the polish may be too aggressive.
Use tape as a warning tool. Mask sharp edges and raised body lines before leveling large panels. Remove the tape only for final light polishing. This small habit can save the most visible areas of the model.
| What You See | What It Usually Means | Safest Next Move |
|---|---|---|
| Even dull surface with no shiny low spots | The clear coat is mostly leveled. | Move to finer grits and polish. |
| Shiny dots inside a dull area | Low spots of orange peel remain. | Continue gently only if clear is thick enough. |
| Color appears on the sanding water or cloth | You may have cut through the clear coat. | Stop sanding and evaluate whether repainting or re-clearing is needed. |
| Fine scratches remain after compound | The previous grit marks were not fully removed. | Return to the last effective fine abrasive and repeat gradually. |
| Gloss looks soft or cloudy | The clear may be under-cured or overworked. | Let it rest longer, then test polish a small hidden area. |
Common Mistakes and When to Get Expert Help
The most common mistake is trying to polish too soon. A finish can feel dry on the surface but still be soft underneath. When that happens, sanding paper clogs, compound smears, and the final shine looks hazy instead of crisp.
Another mistake is sanding without a block on flat areas. Fingertips create uneven pressure. This can produce waves, rounded edges, and small depressions that only appear once the surface becomes glossy. A soft block spreads pressure and helps keep reflections straight.
Using the wrong clear coat for the project can also create problems. Some hobby clears are easier to use but may be softer. Some automotive clears can produce a deep shine but may involve stronger solvents or hazardous components. Do not use professional-grade products without understanding their safety requirements.
You should seek experienced help or professional guidance if you plan to spray high-risk clear coats, work in a poorly ventilated space, repair expensive collector models, or polish a finish with irreplaceable decals. It is also safer to stop and ask for advice if you see color transfer, cracked clear, lifting paint, or repeated fisheyes after cleaning.
- Do not start polishing until the clear coat is fully cured.
- Do not sand sharp edges with the same pressure used on flat panels.
- Do not use dirty water, old cloths, or contaminated sanding paper.
- Do not apply heavy clear coats to hide preparation flaws.
- Do not use a rotary tool at high speed on delicate resin parts.
- Do not wax the model before all polishing residue is removed.
- Do not ignore safety instructions on primer, paint, clear coat, or compound labels.
- Do not keep sanding if color appears on the cloth or water.
For beginners, the safest learning path is to test the complete system on spare resin, plastic spoons, or an old body before using it on an important model. This reveals how the primer, color, clear, abrasive, and polish behave together.
Conclusion
A mirror finish on resin cars depends on preparation, controlled paint layers, careful clear coat leveling, and patient polishing. The shine is not created at the end alone; it is built from the first wash and refined through every stage.
The safest method is to work gradually, inspect often, and use the least aggressive abrasive that solves the problem. Smooth primer, clean color, properly cured clear, and disciplined wet sanding will give polishing compounds a surface they can truly refine.
If the finish involves strong solvents, professional-grade clears, valuable decals, or repeated paint failure, it is better to pause and check the product instructions, safety data sheets, or advice from an experienced model finisher before continuing.
FAQ
1. Can I get a mirror finish on resin cars without clear coat?
It is possible to make some paint systems glossy without clear coat, but a true mirror finish is usually easier and safer with clear coat. Clear gives you extra material to level and polish without cutting directly into the color. This matters especially with metallic, pearl, candy, or decal-heavy finishes. Without clear, wet sanding can quickly damage the color layer or change the way metallic particles reflect light. For beginners, a compatible clear coat is usually the more forgiving route.
2. What grit should I start with for wet sanding clear coat?
Start with the least aggressive grit that can level the defect. If the clear coat is fairly smooth, 3000 grit or finer may be enough. If the orange peel is stronger, you may need to start slightly lower, but only when you have enough clear coat to work with. Starting too coarse creates deeper scratches and increases the risk of cutting through edges. Always test a small area first and move gradually through finer grits before polishing.
3. How do I know if the clear coat is ready to polish?
The clear coat should be fully cured according to the product instructions. It should not feel rubbery, mark easily, smell strongly of solvent, or clog sanding paper immediately. A surface can feel dry but still be soft under the top layer, especially after heavy coats. If polishing creates smears, haze, or sticky residue, stop and allow more curing time. Testing on a hidden area or spare painted sample is safer than experimenting on the most visible panel.
4. Why does my polished resin car still look cloudy?
Cloudiness usually comes from sanding marks that were not fully removed, clear coat that is still too soft, incompatible compounds, or residue left on the surface. First, clean the panel and inspect it under strong light. If you see fine scratches, return to a fine abrasive or compound stage. If the surface feels soft or smears, let it cure longer. Avoid covering the haze with wax because that only hides the problem temporarily and can make later correction harder.
5. Can I use automotive polishing compound on resin scale models?
Yes, but use it carefully. Automotive compounds are made for larger painted surfaces and can be more aggressive than needed on small resin models. Apply a tiny amount, work by hand, and avoid high pressure around edges, vents, pillars, and raised details. If the compound cuts too fast, switch to a finer model-focused polish. Always test first because the result depends on the clear coat hardness, curing time, and how much clear remains after sanding.
Note: this article is educational and intended for hobby-scale resin model finishing. Always follow the instructions and safety data sheets for the specific primer, paint, clear coat, abrasive, and polishing products you use, especially when spraying solvent-based or professional-grade coatings.
Official References
- Occupational Safety and Health Administration — Respiratory Protection
- CDC NIOSH — Personal Protective Equipment
- CDC NIOSH — Respirator Selection Logic
The LS Resin Lab Editorial Team publishes practical, detailed content about resin automotive models, scale-model painting, 3D-printing troubleshooting, surface finishing, airbrushing, and custom model-building techniques. Our guides are prepared for general educational purposes, with a focus on clear instructions, workshop safety, realistic results, and accessible information for hobbyists with different experience levels.